 |
| Image found at metrohomesite.com here |
Unsurprisingly, Ikea came through with their Ribba series picture frames. I ended up buying a bunch of the following frames to hang in a pattern on a wall:
- Ribba, holds 4x6 photos, $1.99 each
- Ribba, holds 5x7 photos, $1.99 each
- Ribba, holds 8x10 photos, $4.99 each*
Informing you that Ikea has inexpensive, complementary goods wouldn't be much of a groundbreaking tip, so read on for the good stuff...
The Problem
While the quality of the Ikea frames is good enough, they have one serious deficiency: The Ribba frames are poorly designed for hanging on a wall.
The back of the frames are just a simple box. There isn't as much as a hanging wire or notch to enable hanging it on a wall. Big time problems.
I could have bought some hanging wire and installed it on the back of each frame, but this would have been time consuming and costly. It also would have been difficult to install uniformly across all of the frames to ensure that, when hung up, they were lined up properly.
My Solution
Simply, my solution is to drill a small hole in the back of each frame and hang it using Hercules Hooks. This procedure will leave you with leveled, centered frames that lay flush against the wall.
Here are the detailed instructions to hang a Ribba series frame using the OurTipsAndTricks.com-exclusive process.
Tools Required
- Power drill and small drill bit (already owned)
- Hercules Hooks (I paid $6.38 for ten, they're now $5.50)
- For those unfamiliar, Hercules Hooks are great hanging options for drywall. No tools required, they leave small holes, and they can hold a good deal of weight.
- Measuring tape or ruler (already owned)
- Simple bubble level (already owned)
- (optional) Laser Level (I paid $37.89 for the Bosch GTL2 Laser Square)**
Step 1
Unwrap the frame from the plastic. We'll keep this procedure simple.
 |
| Unwrap the Frame |
Step 2
Turn the frame over. Note the worthless metal notch thing highlighted in my red box. Then, forget about it because, at about 1 inch deep within the frame, it's useless.
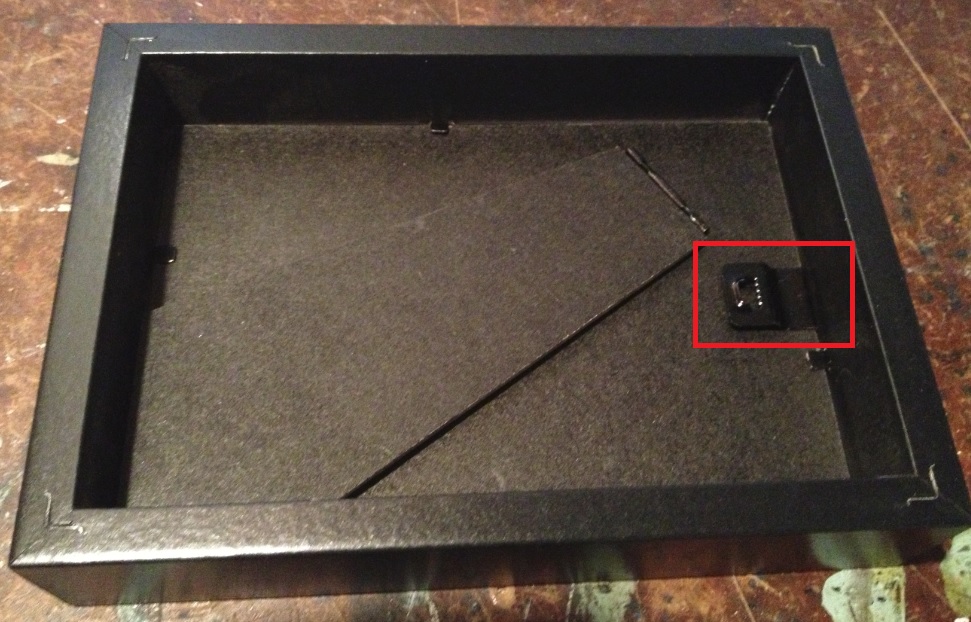 |
| Flip Frame Over, Curse Worthless Metal Thing |
Step 3
Measure the length of the top of the frame. Mark the halfway point for where you'll drill your hole. You'll drill the hole at the midpoint so that the frame will hang level and can be centered when hanging multiple frames in a pattern. The frame pictured was 6.75" long with the midpoint at 3.375".
 |
| Mark Halfway Point of Top of Frame for Hole |
Step 4
Use your electric drill to drill a small hole at your marked midpoint. Use a drill bit slightly larger than the Hercules Hook. The hole should be drilled 1) at a 45 degree angle up and towards the front of the frame, 2) about a 1/4 inch down in the frame, and 3) about 1/3 of an inch deep, but not too deep that it pokes through the top of the frame. However, if your frame will be hung high enough so that the top isn't visible, it doesn't matter if you drill through.
 |
| Select a Drill Bit Slightly Larger than the Hercules Hook |
 |
| Drill a Hole in the Marked Midpoint |
Step 5
Your frame is now good to hang. You just need to install the Hercules Hook where you want to hang the frame. Than position the frame on top of the installed Hercules Hook, and the tip of the Hook should smoothly fit in your drilled hole. Ensure the frame is level with your bubble level.
 |
| Installed Hercules Hook on Scrap Piece of Drywall |
 |
| Installed Frame: Level and Flush Against the Wall |
Final Tip for Installing Multiple Frames (e.g., Gallery Style)
As I also mentioned in the double asterisk below, I hung about 20 Ribba frames in a gallery-style pattern in a long hallway. If you're going to do something similar, you'll need a laser level like the Bosch one I declared optional earlier.
Since the process outlined above places notches in the center of the frame regardless of the frame's dimension, it's pretty straightforward. Just figure out how you want your frames spaced out, take out your laser level, measure and make your marks, and hang the frames.***
 |
| Note My Two Small Marks Spaced 7 Inches Apart |
 |
| Install the Hercules Hooks Where Marked |
 |
| Centered, Level, and Aligned Frames: Note Drilled Hole is not Visible |
Oh, yeah. Last step: Add pictures of your loved ones.
* This is the price displayed online, but I think I paid more :(
** I needed a good laser level because I was hanging about 20 frames in a fancy, gallery-style pattern
*** Check, double-check, and triple-check your measurements before you start marking or putting holes in your walls
*** Check, double-check, and triple-check your measurements before you start marking or putting holes in your walls
I do something very similar, however I nail a little toothed bracket to top of frame, and at the bottom of frame I put little cabinet bumpers. Adds a nice 1/8" buffer between frame and wall.
ReplyDeletewhat is the total length of frames on the wall?
ReplyDeleteMy husband and I just used your tips to hang about 30 ribba frames on our stairs wall - it was super easy! Thanks for sharing!
ReplyDelete