Showing posts with label do-it-yourself satisfaction. Show all posts

Read This: Our Tips and Tricks Power Ranking

To celebrate Our Tips And Tricks' 80th day in existence anniversary, we present a Power Ranking of of our top 10 tips and tricks.  If you haven't read these tips, you should.
  1. "Stretching" Your Spending series of articles.  So good we compiled them all in a primer.  Follow these simple tips by signing up for an airline dining program, using cash back portals for online purchases, and maximizing credit card rewards.  A recent study conducted by OurTipsAndTricks.com shows that not following these tips costs American consumers $3.5 billion per year.*
  2. Replace Your Incandescent Light Bulbs with LEDs.  Good long-term, home investment tip.  Depending on how many bulbs you replace, the decrease in your energy bill can be noticeable.
  3. Hang Ikea Ribba Frames Easily.  Genius, original Our Tips and Tricks fix to a problem.  Gets a lot of love via Google searches.
  4. Panasonic FlashXpress Toaster Oven.  Fantastic toaster oven.
  5. Target REDcard Debit Card.  Save 5% on all Target purchases without a hard credit inquiry.
  6. Let's Dish.  Includes an exclusive, Our Tips and Tricks coupon code for $10 off and free cookies.
  7. Tips for Home Improvement Projects.  Some good stuff here.  Learn from my mistakes.
  8. Window Blinds from SelectBlinds.com.  A good tip that should have been included in the original top tips for home improvement projects.  
  9. Avoid Credit Card Annual Fees.  Too many people I know needlessly pay their credit card annual fees. Don't be another victim.
  10. Price Protection and Other Credit Card Benefits.  Knowing your credit card benefits can save you some serious money.  
* Study may have no basis in reality and may be fictional.

Use This: Homemade Household Cleaner

Normally, I'm not one to shy away from using household chemicals.  However, the addition of Baby Ourtipsandtricks has me reconsidering some of my choices.  

For the past few months we've been using a homemade, chemical-free cleaner for the nursery and other baby-frequented areas.  While I can't verify cleanliness at the microscopic level, the homemade cleaner seemingly does a good job and offers some peace of mind.  It doesn't hurt that it's very inexpensive to make.  

I haven't done any scientific testing on this recipe so I recommend doing a little more research to make an educated decision before using it.  Keep in mind the active ingredient in the recipe, white vinegar, is acidic and may harm some surfaces like those that are painted.  

Homemade Cleaner Recipe
It couldn't be easier.

Ingredients
  • Spray bottle
  • Tap water
  • White vinegar
  • Essential oil (I prefer lemongrass, but other options are available)
Instructions
  1. Add 2 cups of tap water to your spray botttle
  2. Add 1 cup of white vinegar
  3. Add 3 drops of your essential oil to mask the vinegar smell
  4. Shake
Your homemade cleaner is now ready to use.  You can add more drops of the essential oil if the smell isn't strong enough, but keep in mind a little goes a long way with that stuff. 

Buy This: Window Blinds from SelectBlinds.com

The following is another tip to add to our ten considerations for home improvement projects.  If you need window treatments (e.g., blinds), buy them from SelectBlinds.com. Not only are SelectBlinds.com window treatments significantly less expensive than Home Depot, but they are also fully cut to order, which is a significant time saver.
88" x 16" Faux Wood Blinds from SelectBlinds.com
Why SelectBlinds.com for Window Treatments
  • For the same quality, SelectBlinds.com is significantly less expensive than Home Depot.  Furthermore, you can use Mr. Rebates (3%) or Big Crumbs (3.5%) to get a cash rebate on your order.  I successfully double-dipped a cash back rebate with a coupon code.  
  • Instructions for taking measurements are provided and ordering is easy. Not to pick on Home Depot, but the Select Blinds process is less time consuming.  If you make a mistake measuring, they'll correct your mistake for free.
  • The blinds are fully cut to order. That means the both the length and height are cut to your specifications.  While Home Depot will cut the blinds lengthwise, it's an at-home, ugly, and time intensive process to remove slats and cut cords so that the blinds' height match your window.  However, when you order from Select Blinds, you specify the window's height so the blinds (and cord) are cut to your specification.  Believe me when I tell you this is a HUGE time-saver during installation.  This point cannot be emphasized enough.  
Height and Cord Cut to Specification
  • They have a large selection of window treatments.  Notably, they made me 88 inch-long blinds, when Home Depot maxed out at 72 inches. 
  • Their customer service is great. My father didn't like the type of valance that was included in his order of about twenty sets of blinds.  In response to his phone call, Select Blinds sent him a different style valance for his entire order free-of-charge.  
  • Recommendation based on my father's experience above: If you're buying window treatments for a lot of windows, I recommend initially ordering blinds for just one window to ensure you're purchasing the desired quality and style.  They have a large selection and the differences among the various options (e.g., express, priority, premium, select) are unclear.  After you receive your initial order and confirm you're purchasing the desired style, make your complete order.  This may be a good lesson for all bulk online purchases.  
  • They offer free shipping with no minimum purchase.  I wasn't charged tax when I made my purchase, but I don't know if that's changed due to recent Virginia legislation.
Bottom Line: If you need window treatments, you should consider SelectBlinds.com, especially if you're interested in saving money and time.

Create This: Coupon Binder

If you're an Our Tips And Tricks reader, you already know I always try to use coupons when feasible.  What you may not know is that until recently my coupon stockpile was haphazard and disorganized.  Those bi-weekly Bed Bath and Beyond coupons were scattered in various drawers, behind car seats, and in other nooks and crannies.*  BJ's, Babies R Us, Carters, Pampers, and other coupons were all over the house, but I could never find them when I needed them.

My Solution
If you have a similar problem, take five minutes and a few dollars to create the obvious fix: Create a binder for your coupons.  While I've seen people use accordion folders to organize their coupons, I prefer using a 3-ring binder ($2.48) with clear plastic dividers with pockets ($3.42) so that the coupons are visible to quickly skim through.

Since the coupons are visible, your binder doesn't have to be too organized.  Just bunch similar coupons together.  For instance, I have seven folders: Bed Bath and Beyond, Babies R Us, baby clothing, BJ's, car maintenance, restaurants, and random.

The OurTipsAndTricks Coupon Binder
The result is all of my coupons are in one place, stored in my binder at the end of a counter.  When I get a new coupon, I just throw it in the correct folder.  Every month or so, usually coinciding with the delivery of a new BJ's circular, I'll clean out the expired coupons (minus the ones you can use when expired).  

That's it.  Easy (and admittedly obvious)!

*lack of commas in Bed Bath and Beyond is their grammatical error, not mine

Use This: Let's Dish

Be sure to check out an OurTipsAndTricks-exclusive coupon towards the end of this tip!*

We have a serious problem at our house...I have limited time for cooking and I don't think Mrs. OurTipsAndTricks knows where our kitchen is.  

Enter Let's Dish.  Essentially, Let's Dish is a kitchen in a storefront where you can buy fully prepped, gourmet, and healthy meals for a reasonable price.**  Once you select meals from their extensive menu, either you or a store's employee use the Let's Dish kitchen to prepare the meal's ingredients, which often includes marinating a protein, chopping vegetables, and mixing grains with spices.  Once each meal is prepped and bagged, it's frozen.  All you need to do at home is the actual cooking, which is purposefully made to be simple. 
Let's Dish: 12 Locations Throughout Virginia, Maryland, and Minnesota
Why Let's Dish and Dish-n-Dash
Long story short, if you're like me and have limited time to go food shopping and prepare a tasty, balanced meal, Let's Dish takes a lot of the work out of cooking while still leaving the satisfaction of preparing a home cooked meal (and avoiding the guilt of take out).  

While you can assemble the meals yourself during an In-Store session, I prefer and recommend the Dish-n-Dash option.  For an additional $15 preparation fee, Let's Dish employees do the customized meal assembly for you, leaving you only the responsibility (and time commitment) of picking up your order.  To make a Dish-n-Dash order,  simply peruse the month's menu, select your 4, 8, or 12 meals, schedule a time for pick-up (e.g., after work), and pick it up when scheduled. 
Our Two Most Recent Orders
Important HintWhen ordering, make a note to split your meals.***  Without splitting, each meal makes six servings.  If you split your meals, the Let's Dish preparer will divide each dish into two separate packages of three servings each.  A split meal will legitimately provide a meal for three people.  

Here are the reasons why you should use Let's Dish:
  • The food is good and "fancier" than my usual home cooked meal.
  • For Dish-n-Dash, which I recommend, you don't have to do any kitchen prep work.  All the ingredients are prepared (e.g., marinated, chopped, mixed, etc.) and organized by Let's Dish staff based on your customized order.  Just pick it up.
  • The meals are relatively easy to cook.  Defrost a meal in the fridge the day before you're going to cook.  Cooking time is usually about 30 minutes.  Each meal's cooking requirements are detailed in the menu.  
    • That being said, it's not as simple as throwing a carton in the microwave.  You'll need to have items like pots and pans.  Options are usually provided for cooking meats (e.g., grill, oven, etc.). You'll have to boil water for grains (e.g., rice, couscous). 
  • The meals are packaged to order and can keep in the freezer for about 6 weeks.
  • The online ordering process is simple and quick.
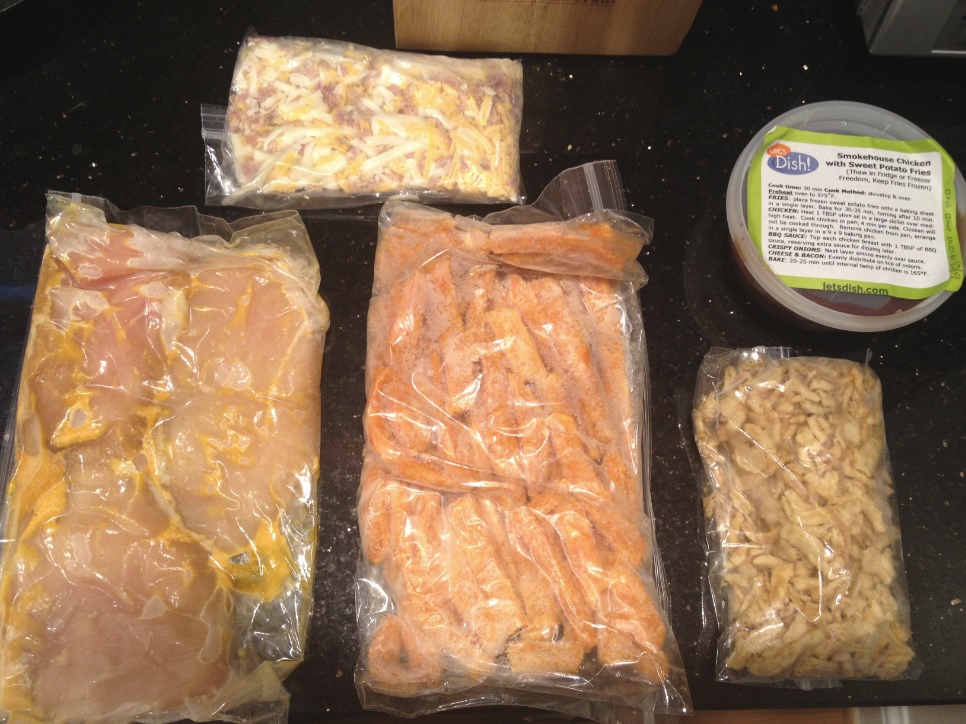
  • Meals are easy to clean and sanitary.  I like how the ingredients are wrapped separately in individual plastic bags (see photos below).  There's no clean-up involved, besides throwing away the bags.
Here are some pictures of a split meal.  
Last Month's Smokehouse Chicken with Sweet Potato Fries: Split Meal
Ingredients Individually Wrapped: Marinated Chicken, Sweet Potato Fries,
Onion Crisps, Bacon & Cheese, and Barbecue Sauce
Cost and Promo Code
The 4-Meal Package (with $15 preparation fee and tax) costs $125.  Since we split our dishes, we actually receive eight meals.  This equates to $15 per meal or $5 per serving.  For the high quality of the food, that goes down as a good deal in my book.  

Now, because I care about you, our loyal OurTipsAndTricks.com readers, I contacted the fine folks at Let's Dish to see if they would provide you a special offer to accompany this tip.  And they have...

When you make any Let's Dish 4-, 8-, or 12-meal order (In-Store, Dish-n-Dash, or DishDelivery), use the promo code TIPSTRICKS to receive $10 off and a free order of cookies.  The only restriction is that there's a two-time limit per customer, but the code doesn't expire until the end of 2014.  

Enjoy!  And if you find this useful, share OurTipsAndTricks.com with your friends.  

* Our Tips And Tricks receives no compensation for this post, except we reserve the right to use TIPSTRICKS on our next two orders.
** I don't know the exact definition of "gourmet" and "healthy," but my gut tells me that Let's Dish meals qualify for both adjectives.  It's certainly more gourmet and healthier than any meal I'd make on my own.
***This is if you have a family of 2 or 3.  If you have a family of 4 of more, you're obviously not going to want to split the meal.

Do This: Hang Ikea Ribba Frames Easily

A couple months ago, the boss assigned me a project to hang a number of family photos in our hallway using simple, black shadow box frames.  She wanted something that looked like the below, but more irregularly shaped.
Image found at metrohomesite.com here 
After searching around for picture frames in various sizes (4x6, 5x7, and 8x10), I was shocked to learn that that "simple, black shadow box frames" were somewhat expensive and difficult to find in multiple sizes in the same style.

Unsurprisingly, Ikea came through with their Ribba series picture frames.  I ended up buying a bunch of the following frames to hang in a pattern on a wall:
  • Ribba, holds 4x6 photos, $1.99 each
  • Ribba, holds 5x7 photos, $1.99 each
  • Ribba, holds 8x10 photos, $4.99 each*
Informing you that Ikea has inexpensive, complementary goods wouldn't be much of a groundbreaking tip, so read on for the good stuff...

The Problem
While the quality of the Ikea frames is good enough, they have one serious deficiency: The Ribba frames are poorly designed for hanging on a wall.  

The back of the frames are just a simple box.  There isn't as much as a hanging wire or notch to enable hanging it on a wall.  Big time problems.

I could have bought some hanging wire and installed it on the back of each frame, but this would have been time consuming and costly.  It also would have been difficult to install uniformly across all of the frames to ensure that, when hung up, they were lined up properly.  

My Solution
Simply, my solution is to drill a small hole in the back of each frame and hang it using Hercules Hooks. This procedure will leave you with leveled, centered frames that lay flush against the wall.  

Here are the detailed instructions to hang a Ribba series frame using the OurTipsAndTricks.com-exclusive process.

Tools Required
  • Power drill and small drill bit (already owned)
  • Hercules Hooks (I paid $6.38 for ten, they're now $5.50)
    • For those unfamiliar, Hercules Hooks are great hanging options for drywall. No tools required, they leave small holes, and they can hold a good deal of weight. 
  • Measuring tape or ruler (already owned)
  • Simple bubble level (already owned)
  • (optional) Laser Level (I paid $37.89 for the Bosch GTL2 Laser Square)**
Step 1
Unwrap the frame from the plastic.  We'll keep this procedure simple.  

Unwrap the Frame
Step 2
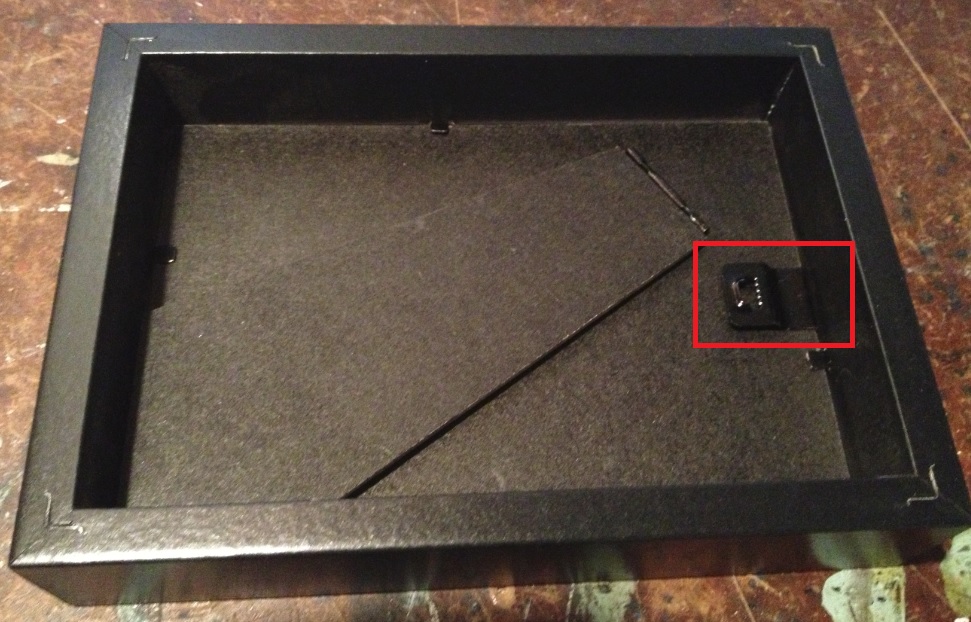
Turn the frame over.  Note the worthless metal notch thing highlighted in my red box.  Then, forget about it because, at about 1 inch deep within the frame, it's useless.

Flip Frame Over, Curse Worthless Metal Thing
Step 3
Measure the length of the top of the frame.  Mark the halfway point for where you'll drill your hole.  You'll drill the hole at the midpoint so that the frame will hang level and can be centered when hanging multiple frames in a pattern.  The frame pictured was 6.75" long with the midpoint at 3.375".

Mark Halfway Point of Top of Frame for Hole
Step 4
Use your electric drill to drill a small hole at your marked midpoint.  Use a drill bit slightly larger than the Hercules Hook.   The hole should be drilled 1) at a 45 degree angle up and towards the front of the frame, 2) about a 1/4 inch down in the frame, and 3) about 1/3 of an inch deep, but not too deep that it pokes through the top of the frame.  However, if your frame will be hung high enough so that the top isn't visible, it doesn't matter if you drill through.

Select a Drill Bit Slightly Larger than the Hercules Hook

Drill a Hole in the Marked Midpoint
Step 5
Your frame is now good to hang.  You just need to install the Hercules Hook where you want to hang the frame.  Than position the frame on top of the installed Hercules Hook, and the tip of the Hook should smoothly fit in your drilled hole.  Ensure the frame is level with your bubble level. 

Installed Hercules Hook on Scrap Piece of Drywall
Installed Frame: Level and Flush Against the Wall
Final Tip for Installing Multiple Frames (e.g., Gallery Style)
As I also mentioned in the double asterisk below, I hung about 20 Ribba frames in a gallery-style pattern in a long hallway.  If you're going to do something similar, you'll need a laser level like the Bosch one I declared optional earlier.  

Since the process outlined above places notches in the center of the frame regardless of the frame's dimension, it's pretty straightforward.  Just figure out how you want your frames spaced out, take out your laser level, measure and make your marks, and hang the frames.*** 

Note My Two Small Marks Spaced 7 Inches Apart
Install the Hercules Hooks Where Marked
Centered, Level, and Aligned Frames: Note Drilled Hole is not Visible
Oh, yeah.  Last step: Add pictures of your loved ones.  


* This is the price displayed online, but I think I paid more :(
** I needed a good laser level because I was hanging about 20 frames in a fancy, gallery-style pattern
*** Check, double-check, and triple-check your measurements before you start marking or putting holes in your walls

Guest Adviser: Make Your Own Seasonings, Rubs, and Spice Blends


If all goes as planned, Sundays will be reserved for a Guest Adviser's Tips and Tricks.  First up is Bob, with his tips on making your own seasonings, rubs, and spice blends.  Please give the man a warm welcome.  He's shy.  

Bob's Tips and Tricks:  We usually make our own spice mixes instead of buying pre-made seasoning packets.  This is helpful for a number of reasons:
  1. It's cheaper.
  2. Recipes can be adjusted for allergies, medical conditions, and taste.
  3. Mixes can be stored for multiple uses in ziplock bags, small containers, or my favorite, plastic deli meat containers (washed and re-used).
  4. You control the spiciness (is this even a word?).
  5. Less odd chemical additives.
  6. It's cheaper.
Some example links to rub and seasoning recipes are listed below.  These are not my recipes and my hat is off to the original authors who put them together.  I have successfully used these exact recipes or variations of them for years:
Most rub and seasoning recipes are nothing more than combinations of spices that you can mix at home with your own ingredients.  These spices can be bought online for additional savings if you're feeling froggy.  I have used the following site, but there are many like it:
One note of caution:  Spices are light and often ordered by weight. Be careful or you can wind up with enough bay leaves to last several hundred years for a very reasonable price.  Ask me how I know…


Cook This: Homemade Corned Beef


Who doesn't enjoy a good corned beef sandwich?  Today, I'm happy to share a homemade corned beef recipe I've been using for a few months.  After your corned beef is baked and sliced, add some Russian dressing, Swiss/Muenster cheese, and cole slaw on rye for a Reuben or just slap some slices on two pieces of bread with some mustard.  It couldn't be easier and it's about a third of the cost of store-bought corned beef from the deli.  You'll also get that do-it-yourself satisfaction.

Ingredients:
  • Approx 2lbs of Corned Beef Brisket (thin cut) - $3.79 a pound at BJ's
  • Mustard (Dijon or Brown) - I use whatever I have in the fridge
  • Brown sugar
Photo of Corned Beef Package Bought from BJs


Directions:
  1. Preheat oven to 375 degrees.
  2. Remove corned beef brisket from its packaging and lay it on a piece of tin foil, fatty side up. You can first rinse the beef under water if you want.
  3. Spread chosen mustard on top of the fat.  Be as generous as you want.
  4. Sprinkle brown sugar on top of the mustard.  Again be generous.
  5. Tightly wrap brisket in tin foil.  Place foiled brisket on top of a baking pan (juices will  leak from the foil).
  6. Place in oven, with fatty side still up.  Cook for 2.5 hours.
  7. After 2.5 hours, open tin foil and broil top of brisket for 2 minutes.
  8. Remove from oven and let brisket cool for 10-15 minutes.
  9. Slice beef and make a sandwich!