Showing posts with label home. Show all posts

Buy This: Toilets with Flat Tank Cover

This is a quick, learn-from-my-mistake tip.  If you're in the market for a new toilet, you want to buy one with a flat/level tank cover.  

About 18 months ago, we bought the Toto Ultramax 1-Piece toilet for a bathroom renovation.  It's a fine toilet except for one problem:  The tank cover isn't flat/level.  

Note the location of the bubble in the horizontal level
If you like to keep items, such as a tissue box or - heaven-forbid - reading materials, on top of the toilet, the sloped tank cover of this toilet makes it difficult as the items will slowly slide off onto the ground.

And that's the tip.  Unless you want to find your tissue box or other toilet-stored things on the floor morning after morning, buy toilets with flat tops.  

Buy This: Inglesina Baby Table Chair

Now that the Our Tips and Tricks family returned from our first vacation with an infant, we have a few hot tips to share.  First up is to buy the Inglesina Fast Table Chair.  Even before our trip, this was one of the most useful baby gifts we received.  However, this trip secured a spot for the Inglesina in the Our Tips and Tricks Baby Gifts Hall of Fame.  At $47, it's a steal.
The Inglesina was already a permanent fixture on our dining table.
Simply, you can securely fasten the chair to most square-edge tables to feed and entertain a baby.  We successfully installed the seat on every restaurant table we visited.  When you're done eating, the Inglesina can be easily dismounted, folded, and packed under a stroller.  Even before the trip, we've been using it at home much more frequently than the big high chair.  Packing it for traveling is easy because it folds flat.

Other points that make the Inglesina either great for personal use or as a gift:

  • The cover is washable.  The instructions say to hand wash it, but I've been tossing it in the washing machine with no ill effects.  
  • It's offered by Amazon in ten different colors. 
  • Leaves no marks or indentations on tables.  
Finally, it's worth mentioning that I've had zero safety concerns using this chair.  However, make sure the seat is tightly fastened and don't leave your kid unattended, as always.


Guest Adviser: Shellac Your Pumpkin

Here's a timely tip from one of our Guest Advisers.  You too can be a Guest Adviser: Simply send in a tip, and if it makes the cut, up it goes.

Beth's Tips and Tricks:  I have a very useful trick for the Halloween season, which you can use for your blog if you like. [editor's note: Sure! We love Guest Advisers!]

Spray your pumpkins with clear acrylic spray paint before displaying them outside. It makes them look nice and shiny.  Even more importantly, it keeps the squirrels from eating them!
Those are some nice pumpkins!
Here's a picture of our shiny, uneaten pumpkins.  Going strong 5 days later!

Read This: Our Tips and Tricks Power Ranking

To celebrate Our Tips And Tricks' 80th day in existence anniversary, we present a Power Ranking of of our top 10 tips and tricks.  If you haven't read these tips, you should.
  1. "Stretching" Your Spending series of articles.  So good we compiled them all in a primer.  Follow these simple tips by signing up for an airline dining program, using cash back portals for online purchases, and maximizing credit card rewards.  A recent study conducted by OurTipsAndTricks.com shows that not following these tips costs American consumers $3.5 billion per year.*
  2. Replace Your Incandescent Light Bulbs with LEDs.  Good long-term, home investment tip.  Depending on how many bulbs you replace, the decrease in your energy bill can be noticeable.
  3. Hang Ikea Ribba Frames Easily.  Genius, original Our Tips and Tricks fix to a problem.  Gets a lot of love via Google searches.
  4. Panasonic FlashXpress Toaster Oven.  Fantastic toaster oven.
  5. Target REDcard Debit Card.  Save 5% on all Target purchases without a hard credit inquiry.
  6. Let's Dish.  Includes an exclusive, Our Tips and Tricks coupon code for $10 off and free cookies.
  7. Tips for Home Improvement Projects.  Some good stuff here.  Learn from my mistakes.
  8. Window Blinds from SelectBlinds.com.  A good tip that should have been included in the original top tips for home improvement projects.  
  9. Avoid Credit Card Annual Fees.  Too many people I know needlessly pay their credit card annual fees. Don't be another victim.
  10. Price Protection and Other Credit Card Benefits.  Knowing your credit card benefits can save you some serious money.  
* Study may have no basis in reality and may be fictional.

Use This: Homemade Household Cleaner

Normally, I'm not one to shy away from using household chemicals.  However, the addition of Baby Ourtipsandtricks has me reconsidering some of my choices.  

For the past few months we've been using a homemade, chemical-free cleaner for the nursery and other baby-frequented areas.  While I can't verify cleanliness at the microscopic level, the homemade cleaner seemingly does a good job and offers some peace of mind.  It doesn't hurt that it's very inexpensive to make.  

I haven't done any scientific testing on this recipe so I recommend doing a little more research to make an educated decision before using it.  Keep in mind the active ingredient in the recipe, white vinegar, is acidic and may harm some surfaces like those that are painted.  

Homemade Cleaner Recipe
It couldn't be easier.

Ingredients
  • Spray bottle
  • Tap water
  • White vinegar
  • Essential oil (I prefer lemongrass, but other options are available)
Instructions
  1. Add 2 cups of tap water to your spray botttle
  2. Add 1 cup of white vinegar
  3. Add 3 drops of your essential oil to mask the vinegar smell
  4. Shake
Your homemade cleaner is now ready to use.  You can add more drops of the essential oil if the smell isn't strong enough, but keep in mind a little goes a long way with that stuff. 

Buy This: Window Blinds from SelectBlinds.com

The following is another tip to add to our ten considerations for home improvement projects.  If you need window treatments (e.g., blinds), buy them from SelectBlinds.com. Not only are SelectBlinds.com window treatments significantly less expensive than Home Depot, but they are also fully cut to order, which is a significant time saver.
88" x 16" Faux Wood Blinds from SelectBlinds.com
Why SelectBlinds.com for Window Treatments
  • For the same quality, SelectBlinds.com is significantly less expensive than Home Depot.  Furthermore, you can use Mr. Rebates (3%) or Big Crumbs (3.5%) to get a cash rebate on your order.  I successfully double-dipped a cash back rebate with a coupon code.  
  • Instructions for taking measurements are provided and ordering is easy. Not to pick on Home Depot, but the Select Blinds process is less time consuming.  If you make a mistake measuring, they'll correct your mistake for free.
  • The blinds are fully cut to order. That means the both the length and height are cut to your specifications.  While Home Depot will cut the blinds lengthwise, it's an at-home, ugly, and time intensive process to remove slats and cut cords so that the blinds' height match your window.  However, when you order from Select Blinds, you specify the window's height so the blinds (and cord) are cut to your specification.  Believe me when I tell you this is a HUGE time-saver during installation.  This point cannot be emphasized enough.  
Height and Cord Cut to Specification
  • They have a large selection of window treatments.  Notably, they made me 88 inch-long blinds, when Home Depot maxed out at 72 inches. 
  • Their customer service is great. My father didn't like the type of valance that was included in his order of about twenty sets of blinds.  In response to his phone call, Select Blinds sent him a different style valance for his entire order free-of-charge.  
  • Recommendation based on my father's experience above: If you're buying window treatments for a lot of windows, I recommend initially ordering blinds for just one window to ensure you're purchasing the desired quality and style.  They have a large selection and the differences among the various options (e.g., express, priority, premium, select) are unclear.  After you receive your initial order and confirm you're purchasing the desired style, make your complete order.  This may be a good lesson for all bulk online purchases.  
  • They offer free shipping with no minimum purchase.  I wasn't charged tax when I made my purchase, but I don't know if that's changed due to recent Virginia legislation.
Bottom Line: If you need window treatments, you should consider SelectBlinds.com, especially if you're interested in saving money and time.

Create This: Coupon Binder

If you're an Our Tips And Tricks reader, you already know I always try to use coupons when feasible.  What you may not know is that until recently my coupon stockpile was haphazard and disorganized.  Those bi-weekly Bed Bath and Beyond coupons were scattered in various drawers, behind car seats, and in other nooks and crannies.*  BJ's, Babies R Us, Carters, Pampers, and other coupons were all over the house, but I could never find them when I needed them.

My Solution
If you have a similar problem, take five minutes and a few dollars to create the obvious fix: Create a binder for your coupons.  While I've seen people use accordion folders to organize their coupons, I prefer using a 3-ring binder ($2.48) with clear plastic dividers with pockets ($3.42) so that the coupons are visible to quickly skim through.

Since the coupons are visible, your binder doesn't have to be too organized.  Just bunch similar coupons together.  For instance, I have seven folders: Bed Bath and Beyond, Babies R Us, baby clothing, BJ's, car maintenance, restaurants, and random.

The OurTipsAndTricks Coupon Binder
The result is all of my coupons are in one place, stored in my binder at the end of a counter.  When I get a new coupon, I just throw it in the correct folder.  Every month or so, usually coinciding with the delivery of a new BJ's circular, I'll clean out the expired coupons (minus the ones you can use when expired).  

That's it.  Easy (and admittedly obvious)!

*lack of commas in Bed Bath and Beyond is their grammatical error, not mine

Use This: Let's Dish

Be sure to check out an OurTipsAndTricks-exclusive coupon towards the end of this tip!*

We have a serious problem at our house...I have limited time for cooking and I don't think Mrs. OurTipsAndTricks knows where our kitchen is.  

Enter Let's Dish.  Essentially, Let's Dish is a kitchen in a storefront where you can buy fully prepped, gourmet, and healthy meals for a reasonable price.**  Once you select meals from their extensive menu, either you or a store's employee use the Let's Dish kitchen to prepare the meal's ingredients, which often includes marinating a protein, chopping vegetables, and mixing grains with spices.  Once each meal is prepped and bagged, it's frozen.  All you need to do at home is the actual cooking, which is purposefully made to be simple. 
Let's Dish: 12 Locations Throughout Virginia, Maryland, and Minnesota
Why Let's Dish and Dish-n-Dash
Long story short, if you're like me and have limited time to go food shopping and prepare a tasty, balanced meal, Let's Dish takes a lot of the work out of cooking while still leaving the satisfaction of preparing a home cooked meal (and avoiding the guilt of take out).  

While you can assemble the meals yourself during an In-Store session, I prefer and recommend the Dish-n-Dash option.  For an additional $15 preparation fee, Let's Dish employees do the customized meal assembly for you, leaving you only the responsibility (and time commitment) of picking up your order.  To make a Dish-n-Dash order,  simply peruse the month's menu, select your 4, 8, or 12 meals, schedule a time for pick-up (e.g., after work), and pick it up when scheduled. 
Our Two Most Recent Orders
Important HintWhen ordering, make a note to split your meals.***  Without splitting, each meal makes six servings.  If you split your meals, the Let's Dish preparer will divide each dish into two separate packages of three servings each.  A split meal will legitimately provide a meal for three people.  

Here are the reasons why you should use Let's Dish:
  • The food is good and "fancier" than my usual home cooked meal.
  • For Dish-n-Dash, which I recommend, you don't have to do any kitchen prep work.  All the ingredients are prepared (e.g., marinated, chopped, mixed, etc.) and organized by Let's Dish staff based on your customized order.  Just pick it up.
  • The meals are relatively easy to cook.  Defrost a meal in the fridge the day before you're going to cook.  Cooking time is usually about 30 minutes.  Each meal's cooking requirements are detailed in the menu.  
    • That being said, it's not as simple as throwing a carton in the microwave.  You'll need to have items like pots and pans.  Options are usually provided for cooking meats (e.g., grill, oven, etc.). You'll have to boil water for grains (e.g., rice, couscous). 
  • The meals are packaged to order and can keep in the freezer for about 6 weeks.
  • The online ordering process is simple and quick.
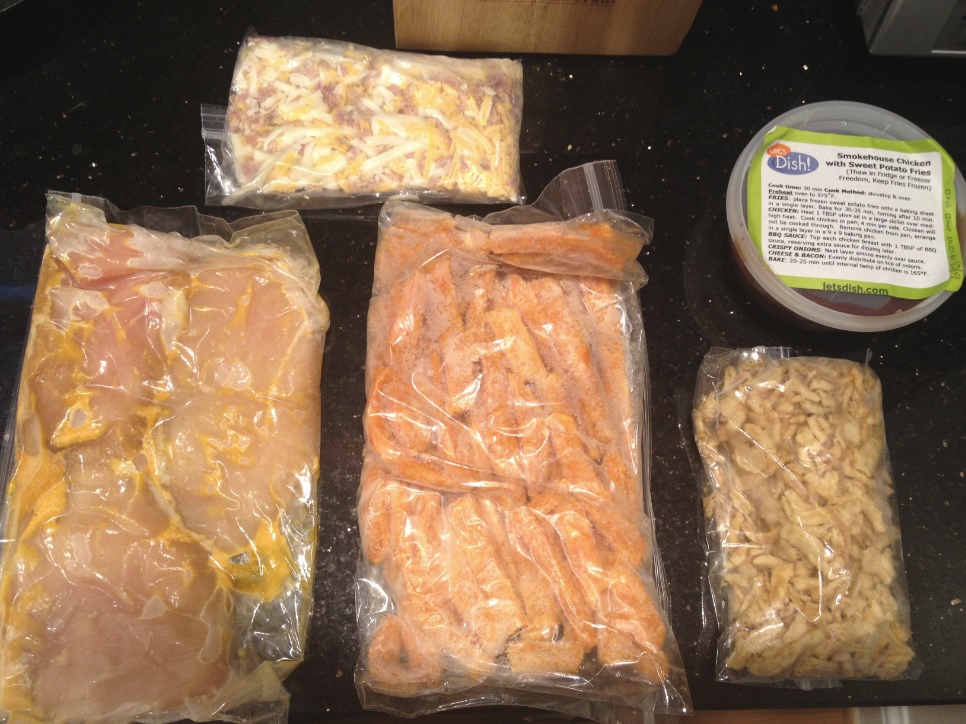
  • Meals are easy to clean and sanitary.  I like how the ingredients are wrapped separately in individual plastic bags (see photos below).  There's no clean-up involved, besides throwing away the bags.
Here are some pictures of a split meal.  
Last Month's Smokehouse Chicken with Sweet Potato Fries: Split Meal
Ingredients Individually Wrapped: Marinated Chicken, Sweet Potato Fries,
Onion Crisps, Bacon & Cheese, and Barbecue Sauce
Cost and Promo Code
The 4-Meal Package (with $15 preparation fee and tax) costs $125.  Since we split our dishes, we actually receive eight meals.  This equates to $15 per meal or $5 per serving.  For the high quality of the food, that goes down as a good deal in my book.  

Now, because I care about you, our loyal OurTipsAndTricks.com readers, I contacted the fine folks at Let's Dish to see if they would provide you a special offer to accompany this tip.  And they have...

When you make any Let's Dish 4-, 8-, or 12-meal order (In-Store, Dish-n-Dash, or DishDelivery), use the promo code TIPSTRICKS to receive $10 off and a free order of cookies.  The only restriction is that there's a two-time limit per customer, but the code doesn't expire until the end of 2014.  

Enjoy!  And if you find this useful, share OurTipsAndTricks.com with your friends.  

* Our Tips And Tricks receives no compensation for this post, except we reserve the right to use TIPSTRICKS on our next two orders.
** I don't know the exact definition of "gourmet" and "healthy," but my gut tells me that Let's Dish meals qualify for both adjectives.  It's certainly more gourmet and healthier than any meal I'd make on my own.
***This is if you have a family of 2 or 3.  If you have a family of 4 of more, you're obviously not going to want to split the meal.

Do This: Hang Ikea Ribba Frames Easily

A couple months ago, the boss assigned me a project to hang a number of family photos in our hallway using simple, black shadow box frames.  She wanted something that looked like the below, but more irregularly shaped.
Image found at metrohomesite.com here 
After searching around for picture frames in various sizes (4x6, 5x7, and 8x10), I was shocked to learn that that "simple, black shadow box frames" were somewhat expensive and difficult to find in multiple sizes in the same style.

Unsurprisingly, Ikea came through with their Ribba series picture frames.  I ended up buying a bunch of the following frames to hang in a pattern on a wall:
  • Ribba, holds 4x6 photos, $1.99 each
  • Ribba, holds 5x7 photos, $1.99 each
  • Ribba, holds 8x10 photos, $4.99 each*
Informing you that Ikea has inexpensive, complementary goods wouldn't be much of a groundbreaking tip, so read on for the good stuff...

The Problem
While the quality of the Ikea frames is good enough, they have one serious deficiency: The Ribba frames are poorly designed for hanging on a wall.  

The back of the frames are just a simple box.  There isn't as much as a hanging wire or notch to enable hanging it on a wall.  Big time problems.

I could have bought some hanging wire and installed it on the back of each frame, but this would have been time consuming and costly.  It also would have been difficult to install uniformly across all of the frames to ensure that, when hung up, they were lined up properly.  

My Solution
Simply, my solution is to drill a small hole in the back of each frame and hang it using Hercules Hooks. This procedure will leave you with leveled, centered frames that lay flush against the wall.  

Here are the detailed instructions to hang a Ribba series frame using the OurTipsAndTricks.com-exclusive process.

Tools Required
  • Power drill and small drill bit (already owned)
  • Hercules Hooks (I paid $6.38 for ten, they're now $5.50)
    • For those unfamiliar, Hercules Hooks are great hanging options for drywall. No tools required, they leave small holes, and they can hold a good deal of weight. 
  • Measuring tape or ruler (already owned)
  • Simple bubble level (already owned)
  • (optional) Laser Level (I paid $37.89 for the Bosch GTL2 Laser Square)**
Step 1
Unwrap the frame from the plastic.  We'll keep this procedure simple.  

Unwrap the Frame
Step 2
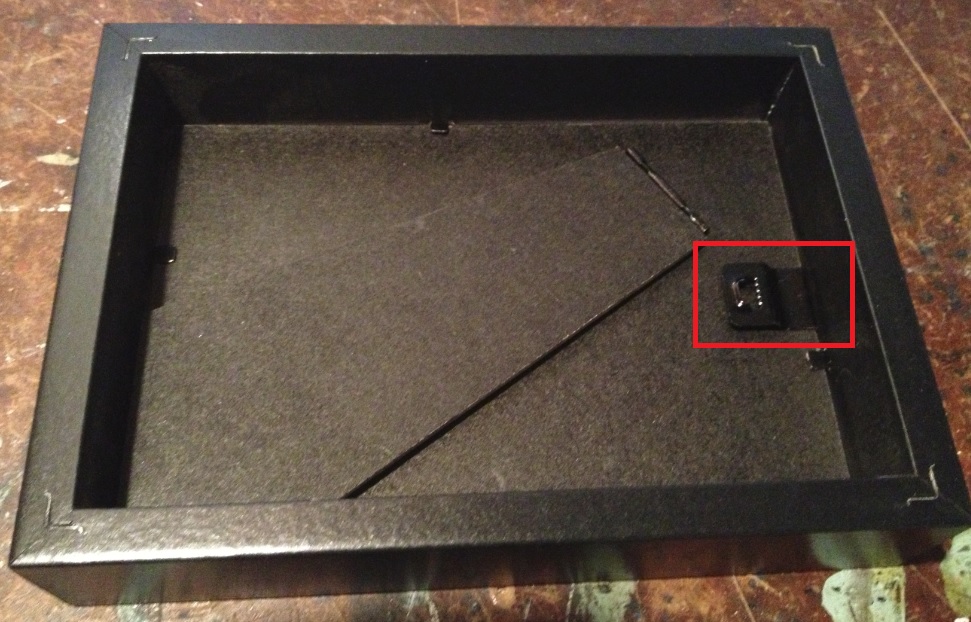
Turn the frame over.  Note the worthless metal notch thing highlighted in my red box.  Then, forget about it because, at about 1 inch deep within the frame, it's useless.

Flip Frame Over, Curse Worthless Metal Thing
Step 3
Measure the length of the top of the frame.  Mark the halfway point for where you'll drill your hole.  You'll drill the hole at the midpoint so that the frame will hang level and can be centered when hanging multiple frames in a pattern.  The frame pictured was 6.75" long with the midpoint at 3.375".

Mark Halfway Point of Top of Frame for Hole
Step 4
Use your electric drill to drill a small hole at your marked midpoint.  Use a drill bit slightly larger than the Hercules Hook.   The hole should be drilled 1) at a 45 degree angle up and towards the front of the frame, 2) about a 1/4 inch down in the frame, and 3) about 1/3 of an inch deep, but not too deep that it pokes through the top of the frame.  However, if your frame will be hung high enough so that the top isn't visible, it doesn't matter if you drill through.

Select a Drill Bit Slightly Larger than the Hercules Hook

Drill a Hole in the Marked Midpoint
Step 5
Your frame is now good to hang.  You just need to install the Hercules Hook where you want to hang the frame.  Than position the frame on top of the installed Hercules Hook, and the tip of the Hook should smoothly fit in your drilled hole.  Ensure the frame is level with your bubble level. 

Installed Hercules Hook on Scrap Piece of Drywall
Installed Frame: Level and Flush Against the Wall
Final Tip for Installing Multiple Frames (e.g., Gallery Style)
As I also mentioned in the double asterisk below, I hung about 20 Ribba frames in a gallery-style pattern in a long hallway.  If you're going to do something similar, you'll need a laser level like the Bosch one I declared optional earlier.  

Since the process outlined above places notches in the center of the frame regardless of the frame's dimension, it's pretty straightforward.  Just figure out how you want your frames spaced out, take out your laser level, measure and make your marks, and hang the frames.*** 

Note My Two Small Marks Spaced 7 Inches Apart
Install the Hercules Hooks Where Marked
Centered, Level, and Aligned Frames: Note Drilled Hole is not Visible
Oh, yeah.  Last step: Add pictures of your loved ones.  


* This is the price displayed online, but I think I paid more :(
** I needed a good laser level because I was hanging about 20 frames in a fancy, gallery-style pattern
*** Check, double-check, and triple-check your measurements before you start marking or putting holes in your walls

Consider This: Tips for Home Improvement Projects

As the area's resident expert in most things, my counsel was recently sought by a neighbor looking for advice for their home improvement project.*  I've been stewing on this subject the past few days and have settled on the following ten tips and tricks, in no particular order: 

  • Budget smartly and accurately.  Research materials (e.g., tiles) and their actual costs at local stores and get an accurate quote for your budget.  Furthermore, build in a cushion for unanticipated costs.  Figure out where you want to splurge and where you can cut costs, if necessary.  It's very easy to rationalize going over budget on your project, so tread carefully.
  • Purchase resold gift cards.  Online merchants (e.g., ABCgiftcards.com) resell "used" gift cards at a discount.  For instance, you can buy Lowes or Home Depot gift cards for 8% off, so a gift card from either store with a $126.05 balance is selling for $115.97.  By buying a resold gift card with a 2% back credit card and coupling your purchase with a 10% off coupon (found via a USPS mover packets or eBay), you can shave about 20% off your Home Depot or Lowes purchases.**  ABCgiftcards.com. which I've successfully used in the past, sends your gift card via free shipping and guarantees that the card will work up to 45 days after purchasing.  You have to plan ahead though as shipping, in my experience, takes about a week.
  • Use cash back portals.  Factor in the cash back from portals like Mr. Rebates and Big Crumbs when comparing prices and be sure to use them whenever possible.  If you're doing a big project like a kitchen, the savings can really add up.
  • Treat construction staff well.  This probably goes without saying, but treat the crew well.  For example, when it's hot, make some cold drinks available.  Little niceties are certainly appreciated.
  • Maximize use of reward credit cards.  If you will not be carrying a credit card balance, use a high-value reward credit card as much as possible.  By the end of the project, you'll probably have earned yourself a free flight or two.  If your contractor will be making big purchases, see if he'll use your credit card and take the amount off your balance.
  • Explore Bluebird by American Express.  This is a graduate school-level tip that I don't want to spend a lot of time on, but it goes hand-in-hand with the above recommendation to maximize use of reward credit cards.  Essentially, once you get a Bluebird account, you load your Bluebird card with prepaid Vanilla Reload cards, which you can buy with a credit card at stores like CVS and Walgreens.  These cards cost $3.95 each and can be each loaded with up to $500.  Each calendar month, you can add $5,000 worth of Vanilla Reload cards (10) to your Bluebird account.  Once your money is in your Bluebird account, you can use free bill pay to pay credit card bills or send checks to people like your contractor.  Besides the $3.95 Vanilla Reload costs, there are no fees with Bluebird.
So what's the benefit, you ask?  Well, you're essentially buying credit card points/miles for less than they're worth.  If you use a 2% cash back card to purchase $5,000 worth of Vanilla Reloads in a month, you earn $100 at a cost of $39.50.  This means, you make $60.50 of free money in a month.  Likewise, you could use Bluebird to reach annual spend bonuses on certain credit cards.  For instance, you can use this method to charge $25,000 to your Chase United MileagePlus Explorer Visa to earn the 10,000 bonus miles for reaching that spend amount.  If you solely used Vanilla Reload cards to reach that $25,000 amount, you would have earned 35,000 miles for a total cost of $197.50 or about a half cent per mile.  Whether or not either option is worth it is up to you.
  • Shop at Wayfair and Amazon.  As I wrote previously, I'm a big fan of Wayfair.  They carry all sorts of furnishings and fixtures, their prices are good, they offer 3% cash back via Mr. Rebates, and their Wayfair Rewards allows you to earn another 3% back for use on future purchases.  Ditto for Amazon.  Shipping via Amazon Prime is fast and painless and I'm always surprised at their prices.  I recently bought a dimmer for my new LED bulbs at Amazon for $25.72.  Home Depot is charging $29.97 plus tax for the same item.  
  • Stay at a local Residence Inn.  If you have to leave your house at any point during construction and don't have a family member or friend's house to crash at, check out a local Residence Inn.  Benefits include a kitchen, separate living space, free breakfast and some dinners, and new construction and good locations in the area.  Sometimes, they'll even offer a "neighborhood rate" for nearby residents.  And they're pet friendly, if that matters.   
  • Know your handyman limitations.  One thing I've learned as a homeowner is that there is no such thing as a simple project.  Whether it's installing a ceiling fan or painting a room, there's always a complication and it takes at least twice as long as initially planned.  For that reason, don't think that you'll finish up certain aspects of the job yourself.  If you've budgeted for and want a tile backsplash, just have the contractor take care of it rather than attempt to do it yourself later.  

On the other hand, there are jobs you can do yourself to save money. For instance, if you want to run wired ethernet cords for TVs or computers, buy yourself a spool of some Cat5 or Cat6 cable (I bought 500ft of this Cat5) and run it with a friend before they install walls. Just think it through (e.g., consider where your router will be) and do the required research (choose the right gauge wire).

  • Say no to Hampton Bay fan remotes.  Last but not least, avoid using the remote controls that are packaged with most Hampton Bay ceiling fans.  Spend an extra $25 or so on wall switches.  I absolutely hate the remote.   They're an ugly off-white/yellow (why aren't they colored white?!?!) and are a pain to figure out.  In retrospect, this is probably my best tip on this page...
If you disagree with any of the above or have a tip or trick of your own, feel free to leave it as a comment!

* It may also be because they're a former victim of my unsolicited advice.  
** I believe Home Depot gift cards can only be used in-store, not online.  I don't know about Lowes.

Use This: Price Protection and Other Credit Card Benefits

About a month ago, my six-year-old computer was on its last legs and on the verge of a complete breakdown.  I did a little shopping around and bought a Dell desktop computer from Best Buy at the regular price of $319.99.*  Since it was an immediate problem, I couldn't wait for a good sale.  I charged the purchase on my Chase Sapphire Preferred credit card and used Big Crumbs to earn 1.7% ($5.60) in cash back

If you studied my guidance on maximizing reward credit cards, you're probably questioning why I used my Sapphire Preferred card instead of my Barclay Arrival card since I would have stretched more value from the purchase with the Arrival (710 points vs. 320 points).  The reason: the Sapphire Preferred card offers a benefit called Price Protection.**  I had a feeling the computer would go on sale within 90 days and wanted to try and take advantage of this Price Protection benefit if the opportunity presented itself.  

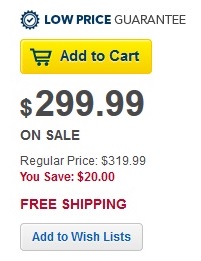
Fast forward two weeks...I checked in on the computer and, lo and behold, it was on sale for $299.99!
  YES! On Sale for $20 Off!       
As soon as I saw this sale I contacted Chase who transferred me to their Price Protection benefits provider.  After a quick discussion, they emailed me a 1-page form to fill out and some instructions.  Fifteen minutes later, I emailed them back, attaching the completed form, a screenshot of the item on sale, and my online receipt.

Yesterday, five days after I emailed in my documentation, I received the following email:

Yes!!!
Using the right credit card, knowing the benefits, and a little price checking vigilance scored me a $20 refund with minimal effort!

The tip here is simple: Know your credit cards' benefits and take advantage of them.  I'm sure the Sapphire Preferred isn't the only credit card that offers a Price Protection benefit.  Other common credit card benefits include rental car insurance, extended warranties, roadside assistance, etc.  Although credit cards with the best benefits often demand annual fees, instances like my price protection success show that sometimes they're worth it.***  


* The computer is basically used for the Internet and Microsoft Office, so we don't need too fancy of a computer.
**The Price Protection benefit states, "Receive a reimbursement for the difference between the price you paid for an eligible item on the card and a subsequent covered lower advertised price for the same item within the first 90 days of purchase."
***This $20 refund alone wouldn't cover the $95 annual fee, but that refund coupled with the 7% end-of-year dividend on points earned will provide a significant dent in the fee.  

Do This: Replace Your Incandescent Light Bulbs with LEDs

We have a fair amount of recessed lightning in our house that use size BR30 indoor flood light bulbs.  All of these fixtures were filled with Sylvania 65-Watt incandescent bulbs, which were emitting a noticeable amount of unwanted heat in addition to costing a small fortune in electricity.  After a couple months of internal debate, I finally crunched the numbers (below) and made the investment in LED bulbs.  I highly recommend you do the same, either for financial or environmental reasons (or both).  Below, you'll see the serious savings.

Buy These Bulbs
I tried two types of bulbs.  First, I bought a Phillips 13-Watt LED bulb for about $29.99 at Home Depot, although it now costs $19.97 at Amazon.  While that bulb emitted soft light, it had a noticeable lag to turn on after hitting the switch. So, I returned it.

The second bulb I tried, which is the one I recommend, is the EcoSmart 9-Watt LED that I bought online at Home Depot.  At $49.88 for a four-pack, these bulbs are each about $8 cheaper than the Phillips bulbs.  Furthermore, I found that while these bulbs were a little brighter than the Phillips, they had no lag when turning on.  I then tested the bulb on existing dimmer switches in the basement and found that the bulbs were indeed dimmable.  In the end, they cost me $12.72 each after factoring in tax and the 4% cash back from Mr. Rebates.*

The Numbers: Why They're Worth Purchasing
I targeted 24 of our most frequently used bulbs to replace for a total investment of $305.28.  I'm a little nervous about the integrity of my Watts to kWh conversion, but my numbers are in the graphic below.**


Crunched Numbers: Incandescent vs LED vs CFL Bulbs
Basically, my math shows that I'll recoup my investment after 710 days.  Over the bulbs' lifetime, I'll save more than $130 each bulb or $3,120 for replacing all 24 bulbs!  The longevity of these LEDs couple with their low wattage should add up to serious savings!

Finally, to get the complete picture, I also ran the comparison against CFL bulbs.  Interestingly, the long-term savings are comparable to LEDs since they're a fraction of the cost.  However, seeing that CFLs contain mercury and require HAZMAT protocols in the event one breaks, I'd recommend passing.  I certainly am.

Final Thoughts
Assuming my math is correct, replacing your incandescents with LED bulbs is an easy household investment to make with a substantial, long-term positive return.  There are some reasons to wait, such as it's possible prices of LED bulbs will decrease and new technology like OLEDs could make them obsolete.  However, since new LED bulbs will begin to pay for themselves in a little less than two years, I'd call it a relatively safe investment, especially if the bulbs last the 22 years as advertised. 


*For a review on how to use cash back portals, see 
http://www.ourtipsandtricks.com/2013/08/UseCashBackPortals.html

** Please let me know if my math is off!

Buy This: Nordic Pure Air Filters

I'm interrupting this week's Stretch Your Spending marathon to share an unsolicited tip I recently gave a friend from work.

If you're a homeowner or renter that needs to replace your furnace and/or air conditioner's air filter, buy and use Nordic Pure air filters.  They are less expensive than other brands (namely 3M's Filtrete) and are just as good, if not better.


My Recommended Air Filter

From a purely cost perspective, a six-pack of 16x25x1 Nordic Pure air filters costs $36.31 on Amazon.  The similar Filtrete six-pack costs $101.69.  That makes the Nordic Pure product a little over a third of the cost of Filtrete's.

From a quality perspective, the Nordic Pure product is equal if not superior to it's closest Filtrete competitor.* The Nordic Pure filter is rated MERV 12, which is supposedly equivalent to an MPR rating of 1500-1915.  The similar Filtrete model has a MPR 1500 rating.  In plain language, both filters will capture everything from  pollen, fine dust, smoke particles, airborne plant spores, bacteria, and even some viruses.

Finally, Nordic Pure makes at least 29 different sizes of air filters.  My system requires filters of three different sizes, all of which are carried by Amazon.  I'd bet that they carry whatever size filter you need.

If I have to have one knock on the filters, it's that you have to buy them in six-packs, which means the extra five will take up some space until you go through them all.  This could be a significant drawback for those that don't have the storage space.  However, if you can get three months of use out of each filter, that's a solid year-and-a-half of filters in one purchase. 

Buy Nordic Pure air filters and start saving some serious money.


*The two companies use different rating systems to measure their filters' success at capturing particles. Nordic Pure uses the universal standard, which is MERV, while Filtrete uses a term they coined called MPR.  In both cases, the higher the value, the better the filter.